- CAD design training
- Creative, video and animation training
- e-Learning and web development training
- Business, media and technical writing training
- Microsoft and AI training


 The Revit user interface
Autodesk’s Revit is a 3D modelling and Building Information Modelling (BIM) application, loaded with specialist tools to enable users to plan and create detailed 3D models, generate construction documentation, and manage building information throughout the project lifecycle.
It’s been an Autodesk application for over 20 years, and has very much become the go-to application for architects, structural engineers, MEP (mechanical, electrical, and plumbing) engineers, designers, and many other types of construction professionals.
Here at Armada, Revit is one of our most popular applications for training; second only to the powerhouse that is AutoCAD. Revit’s interface is dense but dynamic, meaning it can feel a little overwhelming at first. But with a bit of guidance, which you’ll get if you attend our Revit Essentials course, you’ll quickly appreciate how logically it’s actually laid out.
In this blog post, Lyndsay Mann introduces Revit’s user interface and the key features and commands you’ll use to create and work with your Revit models.
Revit Home
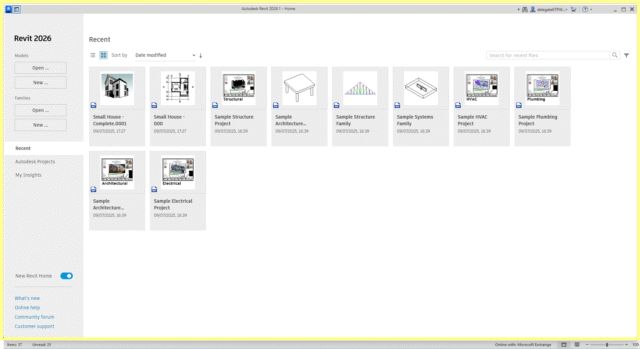
Revit Home is the home page and first screen you see when launching Revit. It acts as a central hub for managing projects and accessing recent files.
You can return to it at any time by clicking the Home button on the Quick Access toolbar, or using the keyboard shortcut Ctrl+D.
From Revit Home, you can:
- Open or create a model or family.
- View or access your recent files.
- Go to the active Revit model and the ribbon.
- View or manage Revit models on Autodesk Docs
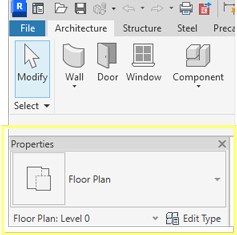
The File menu
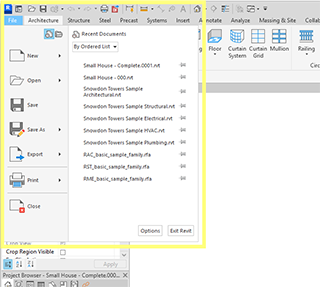
Revit’s File menu is located under the File tab at the very top-left corner. It provides access to common file actions, such as New, Open and Save, and much like the File tab in the other common applications like the Microsoft Excel or Word.
To see the choices available for each menu item, click the arrow to its right then the desired item in the list. You can manage files using more advanced tools, such as export and publish.
As a shortcut, you can click the main buttons in the menu (on the left) to perform the default operation.
Ribbon

The ribbon is the horizontal strip of tools and commands located at the top of the Revit interface. Think of it as Revit’s command central – it’s designed to be intuitive and is broken down into logical tabs, panels, and commands to help you navigate Revit’s powerful functionality.
The ribbon displays when you create or open a file. It contains the tools you need to effectively create, edit, and manage your Revit model. The ribbon is highly customisable, allowing you to tailor the interface to your specific needs and workflows.
Quick Access toolbar
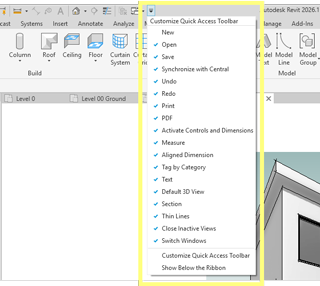
The Quick Access toolbar is the small, customisable toolbar that is located above the ribbon in Revit. It contains frequently used commands and functions that can be accessed with a single click.
As standard, the common tools of Save, Undo/Redo, Open and Modify are all preset, but it’s fully-customisable feature that provides one-click access to your most-used tools, no matter which ribbon tab you’re on. Simply right-click on a tool and select Add to Quick Access Toolbar, and it’ll appear on the toolbar.
Drawing area
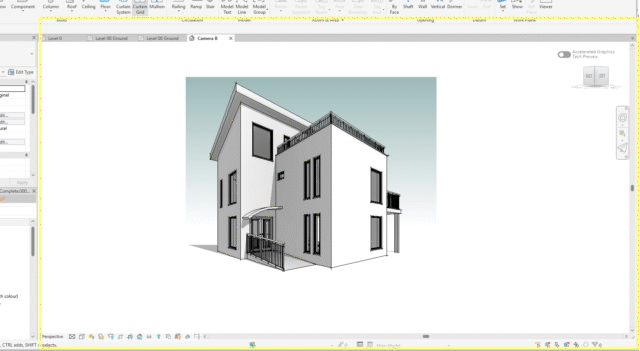
The drawing area in Revit is the main part of the interface, where you view and create your Revit model. In short, it’s the big central space in the centre of the interface where you’ll spend most of your time – like the drawing area in AutoCAD or the workspace in Adobe applications.
The drawing area displays views (and sheets and schedules) for the current Revit model you have open. Each time you open a view in a model, the view displays in the drawing area. It supports multiple tabs where you can switch between different types of views, such as floor plans, 3D views, and elevation views. This allows you to work side-by-side on different parts of a project.
The default colour of the drawing area background is white; but if you’re using Revit 2024 or later, you can change the colour to black if desired, using the new Dark theme.
Status bar

The Status bar is located at the bottom-left of the Revit interface. It provides tips or hints on what to do with the selected element or component. When you highlight an element or component, the status bar shows its the family and type.
Think of it as your trusty guide, that you should keep an eye on. It displays messages that provide helpful feedback on your actions, guiding you through the Revit interface and giving you contextual information and handy prompts along the way. These messages ensure you can take appropriate actions every time and quickly identify potential issues or errors.
Properties palette
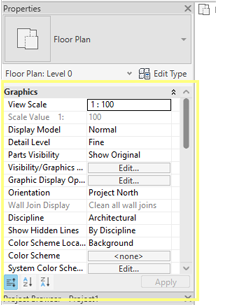
The properties palette in Revit displays, and lets you modify, the parameters of the selected item – whether it’s a wall, door, view or even nothing at all! What you see displayed in the properties palette depends on your selection.
You’ll typically find it docked on the left side of your screen, but it’s technically a floating palette that can be moved around and remains open while you work in the model. (If it vanishes, you can summon it back by going to View>User Interface>Properties.)
The Properties palette is really important for tweaking things like dimensions, materials, visibility settings, etc and it updates dynamically with each selection. This is why it’s always kept open during your Revit session.
Type selector
Revit’s Type Selector is typically located at the top of the Properties palette when an element is selected, or when a tool for placing elements is active.
It identifies the currently selected family type and provides a drop-down from which a different type can be chosen, such as a wall or roof material or construction.
When you click the Type Selector, a search field displays. Enter keywords in the search field to quickly find the content type that you need. For example, if you have Door selected, the Type Selector lets you pick between door types so you’re still using the same family, but simply choosing different types within that family.
Project Browser
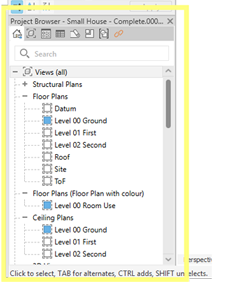
The Project Browser is the vertical panel (usually on the left) that organises and displays every view, sheet, family, schedule and group in your project.
It’s a crucial navigation tool, that provides a list of all elements within a Revit project.
Think of it as your project’s table of contents, filing cabinet, and navigation control centre, all rolled into one!
As you expand and collapse each branch, lower-level items display.
ViewCube and Navigation Bar
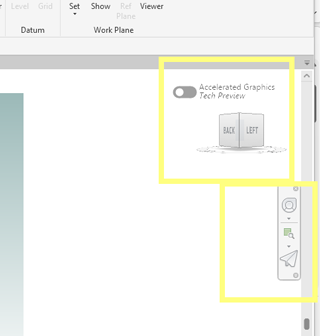
As one of several navigation aids in Revit, the ViewCube is located in the upper-right corner of 3D views. It’s a 3D navigation tool that allows you to quickly switch between standard and isometric views or a 3D model. You use it to rotate, pan and zoom the 3D view of your model.
If you’re familiar with other Autodesk applications, like AutoCAD, Fusion or Inventor, then you’ll already be familiar with the ViewCube as it’s a common tool that appears in many Autodesk products.
The Navigation Bar is a customisable panel that contains other tools for navigating the model view. By default, it appears near the top of the drawing area and next to the ViewCube.
Conclusion
I hope this information is helpful when you start using Revit.
Armada offers Revit training to users at all levels.
For information about our three-day introductory-level courses, see Revit Essentials and Revit MEP Essentials.
For details about the Revit follow-on and task-specific courses available, see Revit follow-on courses.

Leave a comment